Infinite Turtles is a card game I built for SvelteHack 2024 using Svelte 5 and Threlte 8.
I have been playing around with Threlte over the last couple of years and it’s ability to accelerate and simplify 3D web app development has made it a favourite tool of mine. My main aim while building this game was to experiment with Svelte 5, deepen my knowledge of WebGL, and use the pressure of a hackathon deadline to help me actually finish a project. 😅
I came up with the concept and rules for the card game as I was going along so it may not be the most well designed card game of all time but hopefully it is fun to play! In this blog post I’ll give a basic overview of how the game works, focusing on how the 3D scene and UI work together.
If you are not familiar with Threlte it may be worth reading this introduction first to understand how it links Three.js and Svelte together.
Lets get started…
The HTML document
The <canvas> element is where the action happens! It is where the Three.js 3D scene rendered and
is set to fill the full with and height of the browser window inside a container <div> with a
position: relative attribute. The different UI elements are child <div> elements with
position: absolute attribute so that they can be anchored to the top or bottom and left or right
of the screen.
Here is a simplified version of the HTML layout:
<div style="position: relative">
  <!-- Threlte Canvas -->
  <canvas style="width: 100%; height: 100%"></canvas>
  <!-- UI Elements -->
  <div style="position: absolute"></div>
  <div style="position: absolute"></div>
</div>
Overlaying the UI div elements on top of the canvas this way means that pointer events over the UI
are not passed down to the canvas, which is ideal in most cases. To change this behaiviour the
pointer events can be passed through UI elements to the canvas by setting the pointer-events: none
attribute on the UI element.
This leads us on to how to set this up with our Svelte components…
Project structure
Threlte comes with a <Canvas> component to contain our 3D scene. All the other Threlte components
that make up the meshes, geometries and materials of our 3D scene are children of this component. I
find this separation from the rest of our components helpful, but it does beg the question of how to
easily pass data between components as our app and 3d scene grow in complexity.
Here is a simplified representation of the component tree:

Sharing state
I wanted to keep things simple as the project grew so decided to export all shared state from a
single
state.svelte.ts
file. I like to keep the state.svelte.ts file free of methods and as simple as possible so it is
clear at a glance what state is ‘global’ and shared between components. General global properties
are stored in the gameState object which contains things like whether is it the players turn,how
many actions the player has left and the position of the camera.
As playing cards are the main game entities I have given them their own cardState class. Within
this class some properties use
$state runes and some do not depending on whether or not
they need to be reactive and update the UI.
Here is a simplified excerpt of the state.svelte.ts file:
class CardState {
  selectedCard = $state<Card | null>(null)
  hoverCard = $state<Card | null>(null)
  cards: Card[] = []
}

export const cardState = new CardState()
cardState can now simply be imported into any .ts/.svelte file in our project and changes made
to the values of selectedCard and hoverCard will be reflected in our UI.
Cards array
At the heart of the game is the cardState.cards array that contains card objects. Here is a
section of the
types.ts file to show
a simplified structure of our card object:
export type XYZ = { x: number; y: number; z: number }

export type Card = {
  id: string
  typeId: number
  position: XYZ
  moveTo: XYZ
  rotation: XYZ
  rotateTo: XYZ
  health: number
  strength: number
}
The card objects contain properties that will be used to render the card in the correct place on
screen such as position and rotation as well as properties used for gameplay such as strength
and health.
As the game runs our gameplay code will modify the card objects in the array. The
gameActions.ts
file contains functions that perform actions such as adding and removing cards from the array,
assigning cards to different groups such as 'deck' and 'hand' and subtracting health from cards
when they are ‘attacked’.
We need to display the cards from this array on screen, so to do this in our Cards.svelte
component we use
useTask to loop through this array every frame
to set the position and rotation of our 3D meshes.
3D Scene
The Three.js scene is fairly simple. There is a flat plane that acts the background with a
perspective camera positioned above looking down. The card meshes are moved around the space, either
close to the camera when in the hand or flat on the background when placed. When playing the game
you can press the D key on the keyboard to enable the developer camera, then use the mouse to
rotate and explore the 3D scene to see how the different elements move around.
One element you won’t see are the hitboxes used for interactivity. As you can see in the
Hitboxes.svelte
file we loop through the cardState.cards array every frame to set the position
of a simple invisible rectangle geometry in the position of each card to detect when the cursor
position intersects with a card.
The geometries for the card graphics are loaded in from a single GLTF file. Rather then having each
card as its own mesh in the scene the geometry is loaded into a single BatchedMesh. This helps
with performance as during the game no additional meshes are added or removed from the scene.
You can view some of the meshes included in the GLTF file below:
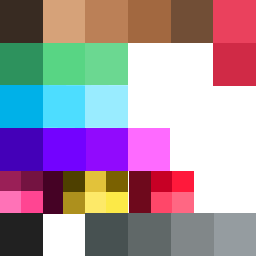
If you select wireframe in the options panel above and zoom in on the geometry you will notice
that each face is a separate solid colour. One benefit to this art style is that a small image can
be used as a texture atlas for all of our meshes, which you can see
here, as each face of geometry is mapped to a
certain colour on this image.
Animations and scheduling
I mentioned above that moving a card to a new position simply involves changing the position
value of the card in the cardState.cards array. However we don’t want cards to snap to the new
position, we want them to travel towards that position over several seconds, so card movement is set
via the moveTo and rotateTo properties in our card object. In the Cards.svelte component every
frame the card array is looped over and the moveTo and position properties are checked to see if
they match. If they don’t the position is updated to be slightly closer to the moveTo value each
frame.
Updates like this that run every frame are done using Threlte’s useTask hook. If you look at cases
where this is used you’ll notice that whenever new position or rotation value is calculated the
delta value is incorporated. The delta value is the time that has passed since the last frame. This
is common when animating to make sure that the aminations run at the same rate regardless of the
frame rate.
The useTask hooks are also assigned to the same stage. This means that we can use Threlte’s
scheduling system to easily pause or adjust the speed of the all our animations using the useTask
Hook:
const { mainStage, renderStage } = useThrelte()

useStage('gameplay-stage', {
  after: mainStage,
  before: renderStage,
  callback: (delta, runTasks) => {
    // Only run the tasks if the game is not paused and use a
    // custom speed value to modify the delta value passed to
    // all instances of useTask with the 'gameplay-stage' key
    if (!gameState.paused) runTasks(delta * speed)
  }
})
UI elements
For animating our UI elements we can use Svelte’s built in animations. Because $state runes are used
in our cardState class it is straightforward to create our UI using svelte DOM components.
One example is
InfoBox.svelte.
This is the information box that appears to the right of a cards when hovering over it. In this
component the cardState.hovercard property is used to get the information about the card that
the mouse is hovering over. Whenever this changes Svelte’s
{#key} utility is used to add and remove the element from
the DOM which will re-run the scale animation whenever the element is re-added.
In conclusion
Hopefully this quick overview gives you a bit of an insight into how the game works. There are plenty more areas of the project to talk about such creating the GLTF file in Blender, using a basic timeline to schedule animations and working with custom materials shaders… the list goes on! So please get in touch let me know if there are any aspects of the project that you would like to hear about in more detail.
You can find me on discord.